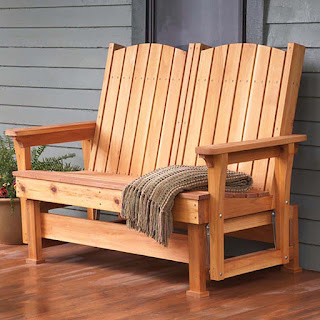
Constructing a Glider Chair with Integrated Storage: A Comprehensive DIY Guide
This document provides a detailed plan for the construction of a glider chair incorporating functional storage. The design prioritizes both comfort and practicality, offering a unique blend of relaxation and organization. The project requires intermediate woodworking skills and the utilization of various power tools. Safety precautions should be strictly adhered to throughout the entire construction process.

Phase 1: Design and Material Selection
1.1 Determining Dimensions and Style
Before commencing construction, careful consideration must be given to the overall dimensions of the glider chair. Measurements should reflect the intended user's height and weight, ensuring optimal comfort and support. The desired style â€" whether traditional, modern, or rustic â€" will dictate the choice of materials and the aesthetic detailing of the finished product. Consider sketching multiple designs and selecting the one that best aligns with your needs and capabilities.
Typical dimensions for a glider chair might range from 30" to 36" in width, 36" to 42" in depth, and 36" to 42" in height. Adjust these figures based on your preferences and the available space. Accurate measurements are crucial for the successful completion of the project. A scale drawing is highly recommended.
1.2 Material Selection and Sourcing
The choice of materials significantly impacts the chair's durability, aesthetics, and overall cost. Hardwoods such as oak, maple, or cherry offer superior strength and longevity but come at a higher price point. Softwoods like pine or fir are more affordable but may require additional reinforcement. The selection should also consider the desired finish; hardwoods often accept stain and finish better than softwoods.
For the storage compartment, consider using plywood for its stability and ease of manipulation. Birch plywood is an excellent choice due to its smooth surface and strength. The following materials will be necessary:
- Hardwood lumber for the frame (e.g., oak, maple, or pine)
- Plywood for the storage compartment (e.g., birch)
- Glider mechanism (available from hardware stores or online retailers)
- Wood screws, bolts, and washers
- Wood glue
- Sandpaper (various grits)
- Wood filler
- Primer and paint or stain (depending on the desired finish)
- Upholstery fabric and foam padding
- Staple gun
1.3 Glider Mechanism Selection
Selecting the appropriate glider mechanism is paramount to the chair's functionality. The mechanism should be sized correctly to accommodate the dimensions of the chair's base. Ensure the mechanism is rated for the weight capacity of the intended user. Carefully examine the manufacturer’s instructions for proper installation.
Phase 2: Construction of the Frame and Storage Compartment
2.1 Constructing the Chair Frame
The frame forms the structural foundation of the chair. The design should incorporate sturdy supports to adequately distribute weight and ensure stability. Accurate cuts and precise joinery are essential for a robust and aesthetically pleasing frame. Begin by cutting the hardwood lumber to the dimensions specified in your design plan. Utilize a table saw, miter saw, or hand saw, ensuring precise measurements for all components.
Joinery techniques such as mortise and tenon joints, dovetail joints, or robust dado joints provide superior strength and stability. Alternatively, robust pocket hole joinery is a reliable method for securely fastening the frame members. After assembling the frame, carefully check for squareness and adjust as necessary.
2.2 Integrating the Storage Compartment
The storage compartment is integrated within the frame. Construct the compartment using plywood, ensuring it fits snugly within the designated space. The compartment should be sufficiently deep and wide to meet storage requirements. The front of the compartment can be hinged to provide access to the interior storage area. The design can include internal dividers or shelves to maximize the organization of stored items.
Precisely cut and assemble the plywood pieces using wood glue and appropriate fasteners. Consider adding reinforcing supports or bracing to enhance the compartment's strength and durability. Ensure that the compartment’s dimensions are compatible with the frame, allowing for seamless integration.
2.3 Attaching the Glider Mechanism
Following the manufacturer's instructions carefully, attach the glider mechanism to the assembled frame. Precise placement is critical for smooth gliding action. Securely fasten the mechanism using appropriate hardware. Test the gliding function to ensure smooth and effortless movement before proceeding to the next phase.
Phase 3: Finishing and Upholstery
3.1 Surface Preparation and Finishing
Before applying the finish, thoroughly sand all wooden surfaces to achieve a smooth and even texture. Start with coarser grit sandpaper and gradually progress to finer grits. Fill any gaps or imperfections with wood filler and allow it to dry completely before sanding again. Apply a wood primer to provide a uniform base for the final finish. Choose a suitable finish; stain is used for enhancing the natural wood grain while paint offers greater flexibility in color selection. Allow ample drying time between coats.
3.2 Upholstery and Padding
Cut and shape the foam padding to fit the chair's seat and back. Secure the padding using a staple gun. Next, drape and secure the upholstery fabric, ensuring it is taut and wrinkle-free. Use a staple gun to fasten the fabric to the underside of the frame. Pay close attention to corners and edges to create a neat and professional finish. Consider using decorative trim or welting to enhance the chair's aesthetics.
Phase 4: Final Inspection and Adjustments
Once the upholstery is complete, conduct a final inspection of the entire chair. Ensure that all joints are secure, the glider mechanism operates smoothly, and the storage compartment functions correctly. Make any necessary adjustments before declaring the project complete. The finished product should be comfortable, durable, and visually appealing.
This detailed guide provides a comprehensive framework for crafting a glider chair with integrated storage. Remember, meticulous planning, precise execution, and attention to detail are key to achieving a successful outcome. Enjoy the process and the satisfaction of creating a unique and functional piece of furniture for your home.


